

Dear, Drew-the-Straw-to-Cook-Thanksgiving-For-the-Entire-Family-This-Year "Winner"...
We all do it, there is no shame. Why do you think I put the word "best" in my article title? Silly- to hook you in! But really this is THE place for you to get help from. I want to make your life and Thanksgiving easy so I put everything you will need on one page. Right here. Oh ya.
This is the old school Thanksgiving food that is better than your moms' moms' mom. None of that fancy new age Martha Stewart reinvented Thanksgiving recipes with ingredients that no one can find in their local grocery store. Who likes water chestnuts in their stuffing? No one, that's who.
You don't need that. It's garbage and honestly nobody wants to eat anything different than what they eat every other year for Thanksgiving. Maybe a new pie flavor, and that's a big maybe. But everything else about the dinner is like the ten commandments. It's written in stone and it's not meant for us to judge or change. That is it.
Now that we've settled that, let's get started from the beginning step by step what you should do starting from the night before Thanksgiving.
Twas The Night Before Thanksgiving...

So you should of by now bought your Turkey (see this Turkey Calculator for what size bird you need for your crowd and appetite size) and have all the veggies you need and any other ingredients and doo-dads that you made a list of from reading the recipes below...right? Right?? Good.
You bought the Thanksgiving wine too I see. So here we are at step one.

#1. Quality Check the Wine
Open one bottle of red wine, pour yourself a glass, and sip while starting your Thanksgiving prep work. You are checking to see if the wine is corked or not.
Who cares if the cap was a twist off, or if like my parents you drink your wine out of a box. You are doing your duty out of respect for your guests palate to make sure the wine is ship shape.
If your family asks you the next day, why is the wine already opened, you raise your eyebrows as if the answer should be perfectly obvious to them and say in a deliberately slow and more than slightly condescending manner, that "The wine needed to breathe". They will know you are lying, so do your best to look as sincere as possible.
You may have bought yours fresh recently and it's in the refrigerator, if so, repeat step 1 and then go on to step 3. If your turkey was bought a week or so ago when it went on sale and you wedged it into your freezer space so that it is virtually impossible to remove so much as an ice tray now, kindly step forward.
Now, grab a pair of forceps and wrestle your frozen bird as if your life depended on it, out of the freezer and into a bowl of warm-hot water in your kitchen sink. You do not want the water to be too hot, or you will start cooking your bird a little early.
#2. Start Thawing Frozen Turkey
You may have bought yours fresh recently and it's in the refrigerator, if so, repeat step 1 and then go on to step 3. If your turkey was bought a week or so ago when it went on sale and you wedged it into your freezer space so that it is virtually impossible to remove so much as an ice tray now, kindly step forward.
Now, grab a pair of forceps and wrestle your frozen bird as if your life depended on it, out of the freezer and into a bowl of warm-hot water in your kitchen sink. You do not want the water to be too hot, or you will start cooking your bird a little early.
No, that is not a cheat way to make your bird cook faster the next day. It will make your bird tough as hell, and your guests gums bleed as they try to chew 39 million times to choke down one morsel.
Every now and again check on the water bath, and replace with new hot tap water to keep thawing the bird out. It will take all night and maybe some of the next morning, so start this as soon as possible.
Every now and again check on the water bath, and replace with new hot tap water to keep thawing the bird out. It will take all night and maybe some of the next morning, so start this as soon as possible.
#3. Cut and Peel Everything in Sight

From the fruit for the pies, to the potatoes for the mashing, to the bread for the stuffing...Cut. It. Up. Now. Why? WHY?
Because you will hate your life tomorrow if you don't. You want to be able to just throw things into pans into the oven and into pots full of water and that is all.
You bought a small countries worth of vegetables and stocked it in your fridge. Cut them all up. Don't think you will use them all?
Cut them all up anyways, the extras can be used for a veggie tray as apps for your guests, and as a rule of thumb it is always better to have extra of everything you are preparing, then to fall short. Trust me, it can get very very ugly if there is not enough for everybody.
#4. Wash Good Dishes, Wine Glasses, & Linens
I know you have a gravy boat in the shape of a pilgrim coming off the Mayflower, or some other kitsch like paraphernalia that you have tucked away in the recesses of your cupboard high above your refrigerator.
You know, that spot where you keep all the good dishes that you use maybe 3 times a year for Easter, Thanksgiving and Christmas that you need to get out the step stool to reach.
Everyone has their good set of plate ware, because common ordinary dinners are for common ordinary plates. Yes most times these holiday dishware's are tacky but it's there, it's tradition, and heck it was on clearance last year after Thanksgiving.
Now take out your stemware, plate ware and fine silverware. Either run them through the dishwasher on a quick rinse, or wash them in mild sudsy warm water, and towel dry immediately to prevent spotting and streaks.
Now take out your stemware, plate ware and fine silverware. Either run them through the dishwasher on a quick rinse, or wash them in mild sudsy warm water, and towel dry immediately to prevent spotting and streaks.
Polish them with a completely dry towel until they give that vibrating ringing sound that means that the job is done.
Decide what table cloth, place mats, cloth napkins and other linens you will use for your table. Take them out and decide if they need to be repressed to freshen them up.
Now go back and repeat step 1, you are doing a heck of a job so far!
Decide what table cloth, place mats, cloth napkins and other linens you will use for your table. Take them out and decide if they need to be repressed to freshen them up.
Now go back and repeat step 1, you are doing a heck of a job so far!
#5. Bake the Bakeables

Dinner Rolls, Pies, and any other Thanksgiving item with the ingredient of flour in it, bake it tonight and coordinate what recipes have the same baking temperature so you can put like items in the oven together to cut down on time. Rolls and pies can be warmed the next day at the end of dinner, to be served piping hot for dessert.
#6 Go to Bed
Enough said.
Thanksgiving Day Preparations
Take your thawed turkey, and start preparations based on the recipe and instructions below. Make the stuffing and set in the baking pans covering each with tin foil to be baked later on in the day closer to supper time.
Set aside enough of the stuffing to be put into the bird. Stuff the bird and depending on the size of the bird and what time your planning on serving dinner, is when you pop it into the oven.
It's better for people to wait a few extra minutes for the bird to be ready instead of it being done too early and drying out "keeping warm" in your oven.
As the day progresses start preparing your side dishes of vegetables to be cooked. Arrange any fruit trays or veggie trays for hungry early arrivers.
Set up the dining area and make sure you have a place for everyone. Have coffee/tea cups and spoons and small plates ready for desserts to be served later on.
Have a separate table for your pies and any other desserts to be placed on and to be able to hone in on any tiny fingers trying to sample the goods early.
Thanksgiving Recipes
The Roast Turkey & Stuffing

Ingredients:
1 Turkey (see turkey calculator at top of page to decide what size is right for you)
Juice of lemon
Salt and pepper
Melted butter
Small yellow onions
Celery
Parsley
Thyme
Sage
Cubed bread
Poultry seasoning
Directions:
Preheat your oven to 350º F. Make sure your bird is fully thawed out and is at room temperature. Important!!! - Remove neck and giblets baggie from the birds inner cavity. Don't make the mistake of leaving that inside and cooking your bird!!Take out a frying pan or skillet and melt a few tablespoons of butter in the pan. Add to this chopped onion and chopped celery. Stir and cook through until the onion is translucent. Add more butter if needed.
Gage amounts of ingredients based on your size of bird and how much stuffing your crowd would like to eat. You want enough onion and celery so that it in ratio to the amount of bread you have cubed up.
Add bread to the pan and mix into it evenly. Once mixed, add poultry seasoning or fresh chopped parsley, chopped Thyme and chopped Sage to this mixture. Set aside.
Take your bird and season the inside of the cavity generously with salt and pepper, poultry seasoning, and a few drops of lemon juice. Stuff as much stuffing into this cavity as you can.
Take your bird and season the inside of the cavity generously with salt and pepper, poultry seasoning, and a few drops of lemon juice. Stuff as much stuffing into this cavity as you can.
Tie the drumstick ends together to help hold in the stuffing. Salt and pepper and season with a little lemon juice and poultry seasoning the neck cavity, add stuffing loosely into this area as well.
Melt some butter on your stovetop and taking a pastry brush, generously butter baste your entire bird all around. Make slits in the skin of your turkey around all the joint areas and lift up the skin at the top of the bird a little near the neck.
Melt some butter on your stovetop and taking a pastry brush, generously butter baste your entire bird all around. Make slits in the skin of your turkey around all the joint areas and lift up the skin at the top of the bird a little near the neck.
Taking your butter and baste a little under the skin near the neck to upper breast area, the joint areas, and wherever your brush can reach into under the skin. Salt and pepper under the skin areas as well. Now salt and pepper the outside of your bird.
Now put your Turkey onto the rack, breast side up, inside your roasting pan. Stick a meat thermometer into your birds thigh if you don't have a turkey with a plastic button gage in it, or if you want to be sure that the gage is correct. Make sure the thermometer doesn't touch the bone.
See the chart below for roasting times for your turkey based on weight and whether you are roasting with stuffing inside. Cover your bird loosely with foil. The last 30 minutes of your roasting time, take off the foil to finish cooking and crisping the skin.
Also untie the legs so the finish cooking as well. At this time bake your remaining stuffing in casserole dishes or bread pans for 25 minutes covered with foil. Last 5 minutes uncover stuffing pans to crisp the tops up if you wish.


Pumpkin Pie From Scratch
.jpg)
Cut and peel pumpkin into small chunks. Boil the pumpkin and reduce to a simmer in a small amount of water (just enough to cover). Drain the water completely, mash up the pumpkin.
.jpg)
Cut and peel pumpkin into small chunks. Boil the pumpkin and reduce to a simmer in a small amount of water (just enough to cover). Drain the water completely, mash up the pumpkin.
Put the mash through a strainer. Take 1 1/2 cups of your strained pumpkin pureé and add to this 1/3 cup brown sugar, 1/3 cup white sugar, 1 tsp. cinnamon, 1/2 tsp. ginger, 1/4 tsp. nutmeg, 1/2 tsp. salt, 1/4 tsp. ground cloves, 2 slightly beaten eggs, 1 1/2 cups milk, and 1/2 cup cream or evaporated milk.
Pour into a pie shell in a 9" pie tin. Wrap the pies edges with strips of tin foil so they don't burn! Bake for 10 minutes at 450º F , then reduce the heat to 300ºF and bake until firm (45 minutes approximately).
Serve with whipped cream.
1/4 tsp. salt
1/2 cup butter chilled and diced
1/4 cup ice water
When ready to use your dough to fit to your pie tins, cut ball in half. Take one half of the dough and place it on a lightly floured board. Flour your rolling pin and dust your hands as well. Roll from the center outwards in all directions to make an even flat circle.
Pour into a pie shell in a 9" pie tin. Wrap the pies edges with strips of tin foil so they don't burn! Bake for 10 minutes at 450º F , then reduce the heat to 300ºF and bake until firm (45 minutes approximately).
Serve with whipped cream.
Buttery Flaky Pie Crust
Ingredients:
1 1/4 cup Flour1/4 tsp. salt
1/2 cup butter chilled and diced
1/4 cup ice water
Directions:
Mix dry ingredients, cut in cubed butter using a pastry cutter. Blend in butter completely into flour (or use a fork if you have no pastry cutter). Add the water gradually. Roll the dough when mixed evenly into a ball. Chill 4 hours wrapped tightly in plastic wrap. Makes one double crust.When ready to use your dough to fit to your pie tins, cut ball in half. Take one half of the dough and place it on a lightly floured board. Flour your rolling pin and dust your hands as well. Roll from the center outwards in all directions to make an even flat circle.
Every now and then, take your pie tin and place it on top of the rolled out dough to gage the size you need. Make sure to roll out enough and maybe an inch extra around in circumference for the dough to be pinched over the edges of the pie tin.
When finished, take your rolling pin, lightly flour it again and roll the pie dough over the pin to help lift it into your pie tin. Lightly press the pie dough into the tin mold. Add desired pie filling.
When finished, take your rolling pin, lightly flour it again and roll the pie dough over the pin to help lift it into your pie tin. Lightly press the pie dough into the tin mold. Add desired pie filling.
If your recipe is a double crust, roll out your other half of the pie dough in the same manner, and lift it with the rolling pin onto the top of your pie filling. Taking both the edges from the bottom pie layer and the top, fold them both under along the edge of the tin.
Now taking your thumb and index finger, pinch the two layers together at the edges, going all around the circumference of the pie. This will keep them from falling apart and adds a decorative look to your pie crust.
Bake at the times and temperatures according to your pie filling recipes. Remember to put foil around the edges of your pie crust to prevent burning, and if it is a double pie crust, cut some slits in the top to all steam to escape.
3/4 to 1 cup sugar
1 tsp. Cinnamon
1 tsp. nutmeg
1/4 tsp. cloves
1 1/3 tbl. butter (to dot the topping with)
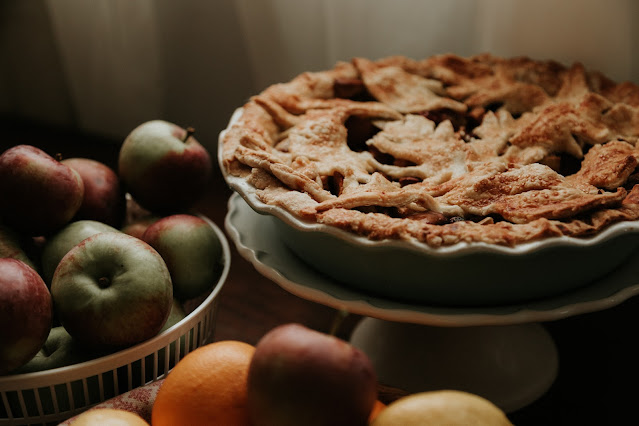
Classic Apple Pie

Ingredients:
6-7 cups sliced apples of your choice3/4 to 1 cup sugar
1 tsp. Cinnamon
1 tsp. nutmeg
1/4 tsp. cloves
1 1/3 tbl. butter (to dot the topping with)
Directions:
Preheat oven to 425ºF. Have a 9" pie tin with pie dough bottom layer already inserted inside and ready. Peel your apples, quarter and core them, and cut them into 1/4" thick slices. Put into a bowl with sugar, and spices. Mix well.Take the apple mixture and any juices and pour it into your uncooked pie shell. Take the butter and scatter dabs on top of your pie filling. Next take your top pie layer and place it gently on top of your filling.
Pinch around the sides to join the two together. Cut slits in the top. (Another idea is before you put on your top pie crust layer, take a small cookie cutter with a shape you like and cut a few shapes into the crust.
Those openings will act as design and also steam vents for your pie! Bake the pie for 50-60 minutes.

0 comments